Air quality, ENS160
Air quality index 1 to 5, TVOC and eCO2 over I2C at 0x53, a sample a second, for ScioSense_ENS160.h.
- 6 pins
- 3 settings
- In 1 project
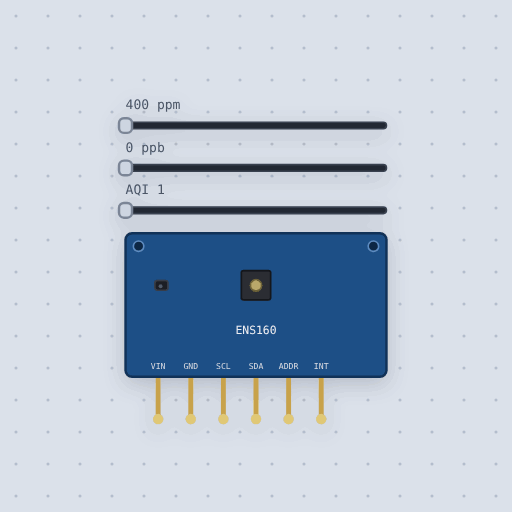
The Air quality, ENS160 in brief
What it is, and every setting the properties panel gives it.
The ScioSense ENS160 is a metal-oxide gas sensor with four tiny heated plates and its own processor. It gives an air quality index from 1 to 5, based on the guideline of Germany's environment agency (UBA), plus TVOC in parts per billion and eCO2 in parts per million. It talks over I2C at 0x53, or 0x52 with ADDR to GND. It does not measure CO2 itself; for that you need an NDIR sensor such as the SCD40. In standard mode it heats its plates and produces three readings every second. In Mokxi, three sliders set aqi (starting at 1), tvoc (starting at 0) and eco2 (starting at 400), and the simulator reports equivalent CO2 in ppm as the next sample will report it. The chip warms up for three minutes after power on, shown by validity bits in the status register. The board carries its own regulator and pull-ups, so 5 V on VIN is fine.
- Family
- Sensors
- Pins
- 6
- aqi
- 1
- tvoc
- 0
- eco2
- 400
A circuit built around it, running and explained: the Air quality sensor simulator.
6 pins
Named as the editor names them, so a wire lands where you expect it.
0x53. To GND it is 0x52.How to use the ENS160 air quality sensor with an Arduino
The ENS160 air quality example is a built-in Mokxi project. An ENS160 board sits on an Arduino Uno's I2C pins and the sketch reads it with the ScioSense_ENS160.h library. It opens in the editor wired up and ready to run.
Wiring is simple. VIN goes to the Uno's 5V pin, GND to GND, SDA to A4 and SCL to A5. The board has its own regulator and pull-ups, so 5 V on VIN is fine. The sketch prints the air quality index, TVOC and eCO2 every second.
With the default settings, the serial monitor shows "ENS160 found at 0x53" then "AQI 1, TVOC 0 ppb, eCO2 400 ppm". That matches the starting values of the three sliders: aqi at 1, tvoc at 0 and eco2 at 400.
Move the sliders while it runs. Setting aqi to 3, tvoc to 300 and eco2 to 1200 changes the output to "AQI 3, TVOC 300 ppb, eCO2 1200 ppm". The next sample reports the new values. Try printing the warm-up flag, or turn on an LED when the AQI reaches 4.
// An ENS160 air quality sensor.
//
// The ENS160 answers at 0x53 (0x52 with ADDR to GND). begin() resets it and
// checks its part number; standard mode then heats its four tiny hot plates
// and gives three readings every second: the air quality index (1 excellent
// to 5 unhealthy, from Germany's UBA guideline), TVOC in ppb and eCO2 in
// ppm.
//
//   ENS160  VIN -> 5V, GND -> GND, SCL -> A5, SDA -> A4
//
// The board has its own regulator and pull-ups, so 5 V on VIN is fine.
// Move the three sliders while it runs.
//
// THINGS TO TRY. Print the warm-up flag: bits 2 and 3 of the status
// register (0x20) read 1 for the first three minutes. Then turn on an LED
// when the AQI reaches 4.

#include <Wire.h>
#include "ScioSense_ENS160.h"

ScioSense_ENS160 ens160(ENS160_I2CADDR_1);

void setup() {
  Serial.begin(9600);
  if (!ens160.begin()) {
    Serial.println("No ENS160 at 0x53: check SDA, SCL and power.");
    while (1) {}
  }
  Serial.println("ENS160 found at 0x53");
  ens160.setMode(ENS160_OPMODE_STD);
}

void loop() {
  if (ens160.measure(true)) {
    Serial.print("AQI ");
    Serial.print(ens160.getAQI());
    Serial.print(", TVOC ");
    Serial.print(ens160.getTVOC());
    Serial.print(" ppb, eCO2 ");
    Serial.print(ens160.geteCO2());
    Serial.println(" ppm");
  }
  delay(1000);
}
Common Air quality, ENS160 errors and fixes
Questions and answers
What does the ENS160 measure?
It gives an air quality index from 1 to 5, TVOC in parts per billion and eCO2 in parts per million. It makes three readings every second in standard mode.
Can the ENS160 measure carbon dioxide?
No. It reports eCO2, the CO2 level that would come with the measured compounds. For real CO2 you need an NDIR sensor such as the SCD40.
What voltage should I give the ENS160 board?
The board takes 3.3 or 5 V on VIN. It has its own regulator and level shifters, so 5 V works fine on an Arduino Uno.
What are the ENS160 settings in Mokxi?
There are three sliders: aqi starts at 1, tvoc starts at 0 and eco2 starts at 400. You can move them while the circuit runs, and the next sample reports the new values.
What is true about the Air quality, ENS160, here
In its help article’s own words: what the simulation gets right, and where it stops.
Not modeled
The gas chemistry: the three readings are the three sliders, set apart from each other, so
the UBA table that ties the index to TVOC is not applied. The one hour initial start-up of a
brand new sensor (the part is taken as run in), the temperature and humidity compensation,
the raw hot plate resistances (GPR_READ in standard mode reads zero, so the library's
measureRaw() finds no new data), DATA_MISR, the custom heater sequences, SPI and the
ENS161's low power mode are not simulated. The datasheet gives no start-up time, so the chip
answers at once.
From ENS160 air quality sensor, in full.
See the Air quality, ENS160 in a project
One built-in project uses it. It opens in the editor, already wired.
The boards it is shown on
This board has a built-in project with the Air quality, ENS160 in it.
The rest of the bench
Every one of these is drawn and simulated the same way.
Wire up the Air quality, ENS160
Open the editor and push it into the breadboard. It is free, and it runs on your own machine.