CO2 sensor, MH-Z19B
CO2 in ppm from the 0x86 serial read at 9600 baud, a 1004 ms PWM and a 0.4 to 2 V output, with zero and span calibration, for MHZ19.h.
- 7 pins
- 3 settings
- In 1 project
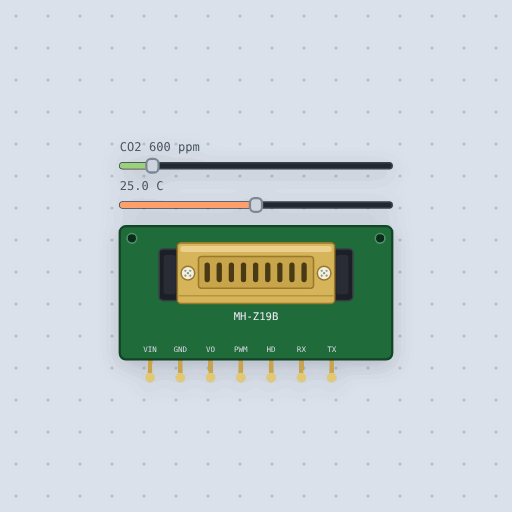
The CO2 sensor, MH-Z19B in brief
What it is, and every setting the properties panel gives it.
The MH-Z19B is an infrared (NDIR) carbon dioxide sensor from Winsen. It reports CO2 in parts per million three ways: over serial at 9600 baud, as a PWM signal, and as an analog voltage. Every serial command is nine bytes, and the read answer carries the CO2 split into a high and low byte, plus a temperature byte. Mokxi models the command frames, the check byte, the read answer, the PWM cycle and formula, the analog voltage scale, the 7 second HD zero calibration and the 4.5 V minimum supply, all from the Winsen manual V1.3. The zero and span calibrations move readings the way they do on the real sensor, and the range setting holds the serial reading, the PWM and the analog output alike. The real sensor needs 3 minutes to warm up and takes up to 2 minutes to follow a change in the air. In Mokxi the reading follows the slider at once, exactly, with none of its 50 ppm plus 5 percent error.
- Family
- Sensors
- Pins
- 7
- co2
- 600
- temperature
- 25
- range
- 5000 (or 2000, 10000)
A circuit built around it, running and explained: the CO2 sensor simulator.
7 pins
Named as the editor names them, so a wire lands where you expect it.
Input or output2
- VIN
- GND
Output3
- VO
- PWM
- TX
Input2
- HD
- RX
How to use the MH-Z19B CO2 sensor with an Arduino
This page features a built-in project called MH-Z19B CO2 monitor. An MH-Z19B infrared CO2 sensor sits on an Arduino Uno's SoftwareSerial, read with the MHZ19 library. It runs beside these words, and it opens in the editor as it is drawn here.
The wiring is simple. The sensor's TX goes to pin 2, RX to pin 3, VIN to 5 V, and GND to GND. The sketch prints the CO2 level, the temperature, and some advice. Fresh outdoor air is about 420 ppm. A closed room full of people climbs past 1000 ppm, which is when a window wants opening.
Running the example with the default settings, the serial monitor shows: "MH-Z19B CO2 monitor" and then "CO2 650 ppm, 25 C, fresh".
Change the sensor's co2 setting to 1500 and the sketch answers differently: "MH-Z19B CO2 monitor" and then "CO2 1500 ppm, 25 C, air the room now". Only the CO2 value and the advice changed. Drag the CO2 slider on the sensor and watch it happen live.
// MH-Z19B CO2 monitor: an infrared CO2 sensor on SoftwareSerial.
//
//   MH-Z19B TX -> pin 2    MH-Z19B RX <- pin 3    VIN -> 5 V    GND -> GND
//
// The sensor answers a nine byte read command at 9600 baud with the CO2 in
// parts per million. The MHZ19 library sends the command and checks the
// answer, and errorCode says whether one came back. Fresh outdoor air is
// about 420 ppm; a closed room full of people climbs past 1000 ppm, which is
// when a window wants opening.
//
// Automatic baseline correction is off here: it treats the lowest reading of
// each day as 400 ppm, which is right for an office aired every night and
// wrong for a greenhouse or a bedroom.
//
// Drag the CO2 slider on the sensor and watch the advice change.

#include <MHZ19.h>
#include <SoftwareSerial.h>

SoftwareSerial co2Serial(2, 3);  // RX (the sensor's TX), TX (the sensor's RX)
MHZ19 mhz19;

const char *advice(int ppm) {
  if (ppm < 800) return "fresh";
  if (ppm < 1000) return "getting stuffy";
  if (ppm < 1500) return "open a window";
  return "air the room now";
}

void setup() {
  Serial.begin(115200);
  co2Serial.begin(9600);
  mhz19.begin(co2Serial);
  mhz19.autoCalibration(false);
  Serial.println("MH-Z19B CO2 monitor");
}

void loop() {
  int ppm = mhz19.getCO2();
  if (mhz19.errorCode != RESULT_OK) {
    Serial.println("No answer from the MH-Z19B: check TX, RX and 5 V");
    delay(2000);
    return;
  }
  float celsius = mhz19.getTemperature();
Common CO2 sensor, MH-Z19B errors and fixes
Questions and answers
How do I read CO2 with an MH-Z19B?
Use the MHZ19 library. Call mhz19.begin(co2Serial) at 9600 baud, then mhz19.getCO2() returns the CO2 in ppm. Check that errorCode is RESULT_OK.
What CO2 level is bad?
Fresh outdoor air is about 420 ppm. Past 1000 ppm a room is getting stuffy and a window wants opening. Past 1500 ppm, air the room now.
What voltage does the MH-Z19B need?
It needs 4.5 V to 5.5 V on VIN. Under 4.5 V the sensor does nothing, so wire it to the Arduino's 5 V pin.
Can I change the sensor range?
Yes. The range can be 2000, 5000 or 10000 ppm. Every output, serial, PWM and analog, is held to it. The library's setRange() sends the command.
What is true about the CO2 sensor, MH-Z19B, here
In its help article’s own words: what the simulation gets right, and where it stops.
Modeled
The command frames, the check byte, the read answer, the PWM cycle and formula, the Vo scale, the 7 second HD calibration and the 4.5 V minimum supply are the Winsen manual's (V1.3). The zero and span calibrations move the readings the way they do on the real sensor, and the range holds the serial reading, the PWM and Vo alike.
Not modeled
The real sensor needs 3 minutes to warm up and takes up to 2 minutes to follow a change in
the air; here the reading follows the slider at once, exactly, with none of its 50 ppm plus
5 percent error. The automatic baseline correction runs once a day on the real sensor; the
command is taken here, but no run lasts a day. Commands the datasheet does not list (the
library's getRange(), getABC(), getVersion() and the unlimited read 0x85) get no
answer, because the datasheet does not say what the sensor sends back.
From MH-Z19B CO2 sensor, in full.
See the CO2 sensor, MH-Z19B in a project
One built-in project uses it. It opens in the editor, already wired.
The boards it is shown on
This board has a built-in project with the CO2 sensor, MH-Z19B in it.
Keep going
The rest of the bench
Every one of these is drawn and simulated the same way.
Wire up the CO2 sensor, MH-Z19B
Open the editor and push it into the breadboard. It is free, and it runs on your own machine.