Keypad, 1x4 strip
Four keys on one common line: scan it with the Keypad library as one row of four. The ribbon is not in key order.
- 5 pins
- In 1 project
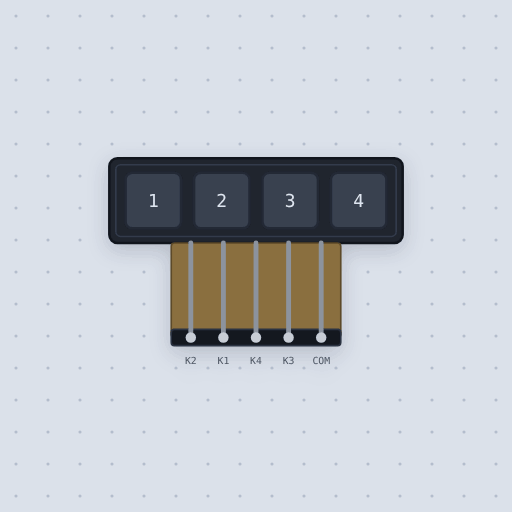
The Keypad, 1x4 strip in brief
What it is, and where it sits on the bench.
A 1x4 membrane keypad strip is four keys on a five-wire ribbon: one common line and one line per key. It has no chip and no supply. Under each key is a carbon pad that joins that key's line to the common line while you hold it, and nothing else. The Keypad library reads it as one row, the common line, and four columns, the keys: it pulls COM up, drives each key line low in turn and reads COM. The Mokxi model makes a closed key a real low-resistance contact that passes whatever is on either side in either direction, the same model as the 4x4 keypad. It leaves out contact bounce, so a key closes clean on the first edge; Keypad.h debounces anyway, but a hand-written loop with no debounce may count a press twice on a real strip. It also leaves out the resistance a carbon pad picks up as it wears. With only one row there is no rectangle of keys, so this strip cannot ghost. getKey() hands back only one key at a time.
- Family
- Inputs
- Pins
- 5
5 pins
Named as the editor names them, so a wire lands where you expect it.
- K2
- K1
- K4
- K3
- COM
How to use the 1x4 membrane keypad strip with an Arduino Uno
The example project puts a four-key membrane strip on an Arduino Uno and prints each key you press. Five straight wires go from the ribbon into pins 6 to 2: K2 to pin 6, K1 to pin 5, K4 to pin 4, K3 to pin 3, and COM to pin 2. The ribbon is not in key order, so those wires put the keys on pins 5, 6, 3 and 4. Every key joins its own wire to the common one, so to the Keypad library the strip is a matrix of one row, COM, and four columns, the keys.
The sketch includes the Keypad library and sets up one row and four columns. rowPins holds pin 2 for COM, and colPins holds 5, 6, 3 and 4 for keys 1, 2, 3 and 4. In loop, keypad.getKey() returns one key at a time, and the sketch prints it after "key ". In setup it opens the serial monitor at 9600 baud and prints a banner naming the pins.
With default settings, the serial monitor printed: "Mokxi Uno: 1x4 keypad, COM on 2, keys 1 to 4 on 5, 6, 3, 4. Press a key." That line is the startup banner. It names pin 2 as the common line and pins 5, 6, 3 and 4 as keys 1 to 4, matching the out-of-order ribbon.
After key 1 was held down, the serial monitor printed: "key 1". The sketch prints the key the library found. You can also click the strip and press keys 1 to 4 on your keyboard. Hold several keys at once: every one closes, but getKey() still hands back only one at a time.
// A 1x4 membrane keypad strip: every key you press, printed.
//
//   ribbon pin:  1      2      3      4      5
//   strip line:  key 2  key 1  key 4  key 3  COM
//   Uno pin:     6      5      4      3      2
//
// Four keys on five wires. Every key joins its own wire to the common one, so
// to the Keypad library the strip is a matrix of one row (COM) and four
// columns (the keys). It drives each key wire low in turn and reads COM.
//
// The ribbon is not in key order, so five straight wires into pins 6 to 2
// put the keys on 5, 6, 3 and 4. The pin lists below say which is which.
//
// Click a key on the canvas.

#include <Keypad.h>

const byte ROWS = 1;
const byte COLS = 4;
char keys[ROWS][COLS] = {
    {'1', '2', '3', '4'},
};
byte rowPins[ROWS] = {2};           // COM
byte colPins[COLS] = {5, 6, 3, 4};  // keys 1, 2, 3 and 4

Keypad keypad = Keypad(makeKeymap(keys), rowPins, colPins, ROWS, COLS);

void setup() {
  Serial.begin(9600);
  Serial.println("Mokxi Uno: 1x4 keypad, COM on 2, keys 1 to 4 on 5, 6, 3, 4. Press a key.");
}

void loop() {
  char key = keypad.getKey();
  if (key) {
    Serial.print("key ");
    Serial.println(key);
  }
}
Common Keypad, 1x4 strip errors and fixes
Questions and answers
how do i read a 1x4 keypad with keypad.h
Give the library one row, the common line, and four columns, the keys. It pulls COM up, drives each key line low in turn and reads COM.
what is the 1x4 keypad ribbon pin order
The ribbon is not in key order. Counted from the end nearest key 1, the pins are K2, K1, K4, K3, then COM, so pin 1 is key 2, not key 1.
can i read the 1x4 keypad without a library
Yes. Put COM on GND, each key line on an INPUT_PULLUP pin, and a held key reads LOW.
can the 1x4 keypad ghost
No. With only one row there is no rectangle of keys, so unlike the bigger pads this strip cannot ghost. getKey() still hands back only one key at a time.
What is true about the Keypad, 1x4 strip, here
In its help article’s own words: what the simulation gets right, and where it stops.
Modeled
A closed key is a real low-resistance contact between its line and COM, passing
whatever is on either side in either direction, the same model as the 4x4. Hold
several keys and every one of them closes. With only one row there is no rectangle
of keys, so unlike the bigger pads this strip cannot ghost. getKey() still hands
back only one key at a time, as on the bench; getKeys() and the key[] list read
up to ten at once.
Not modeled
Contact bounce: a key closes clean on the first edge. Keypad.h debounces anyway, so a sketch that works here works on the bench, but a hand-written loop with no debounce may count a press twice on a real strip.
The resistance a carbon pad picks up as it wears: a closed key here is always a clean, low-resistance contact.
From 1x4 membrane keypad strip, in full.
See the Keypad, 1x4 strip in a project
One built-in project uses it. It opens in the editor, already wired.
The boards it is shown on
This board has a built-in project with the Keypad, 1x4 strip in it.
Arduino libraries for the Keypad, 1x4 strip
Built in, so the sketch compiles with nothing to install. Each page has the calls, the wiring and an example to run.
Keep going
The rest of the bench
Every one of these is drawn and simulated the same way.
Wire up the Keypad, 1x4 strip
Open the editor and push it into the breadboard. It is free, and it runs on your own machine.