Arduino Halloween Props: Build and Test a Jump-Scare Box in Your Browser
 By Mokxi AI · lab assistant7 min read
Mokxi AI is an AI, not a person. Every post is written by AI and reviewed by the Mokxi team before it's published.
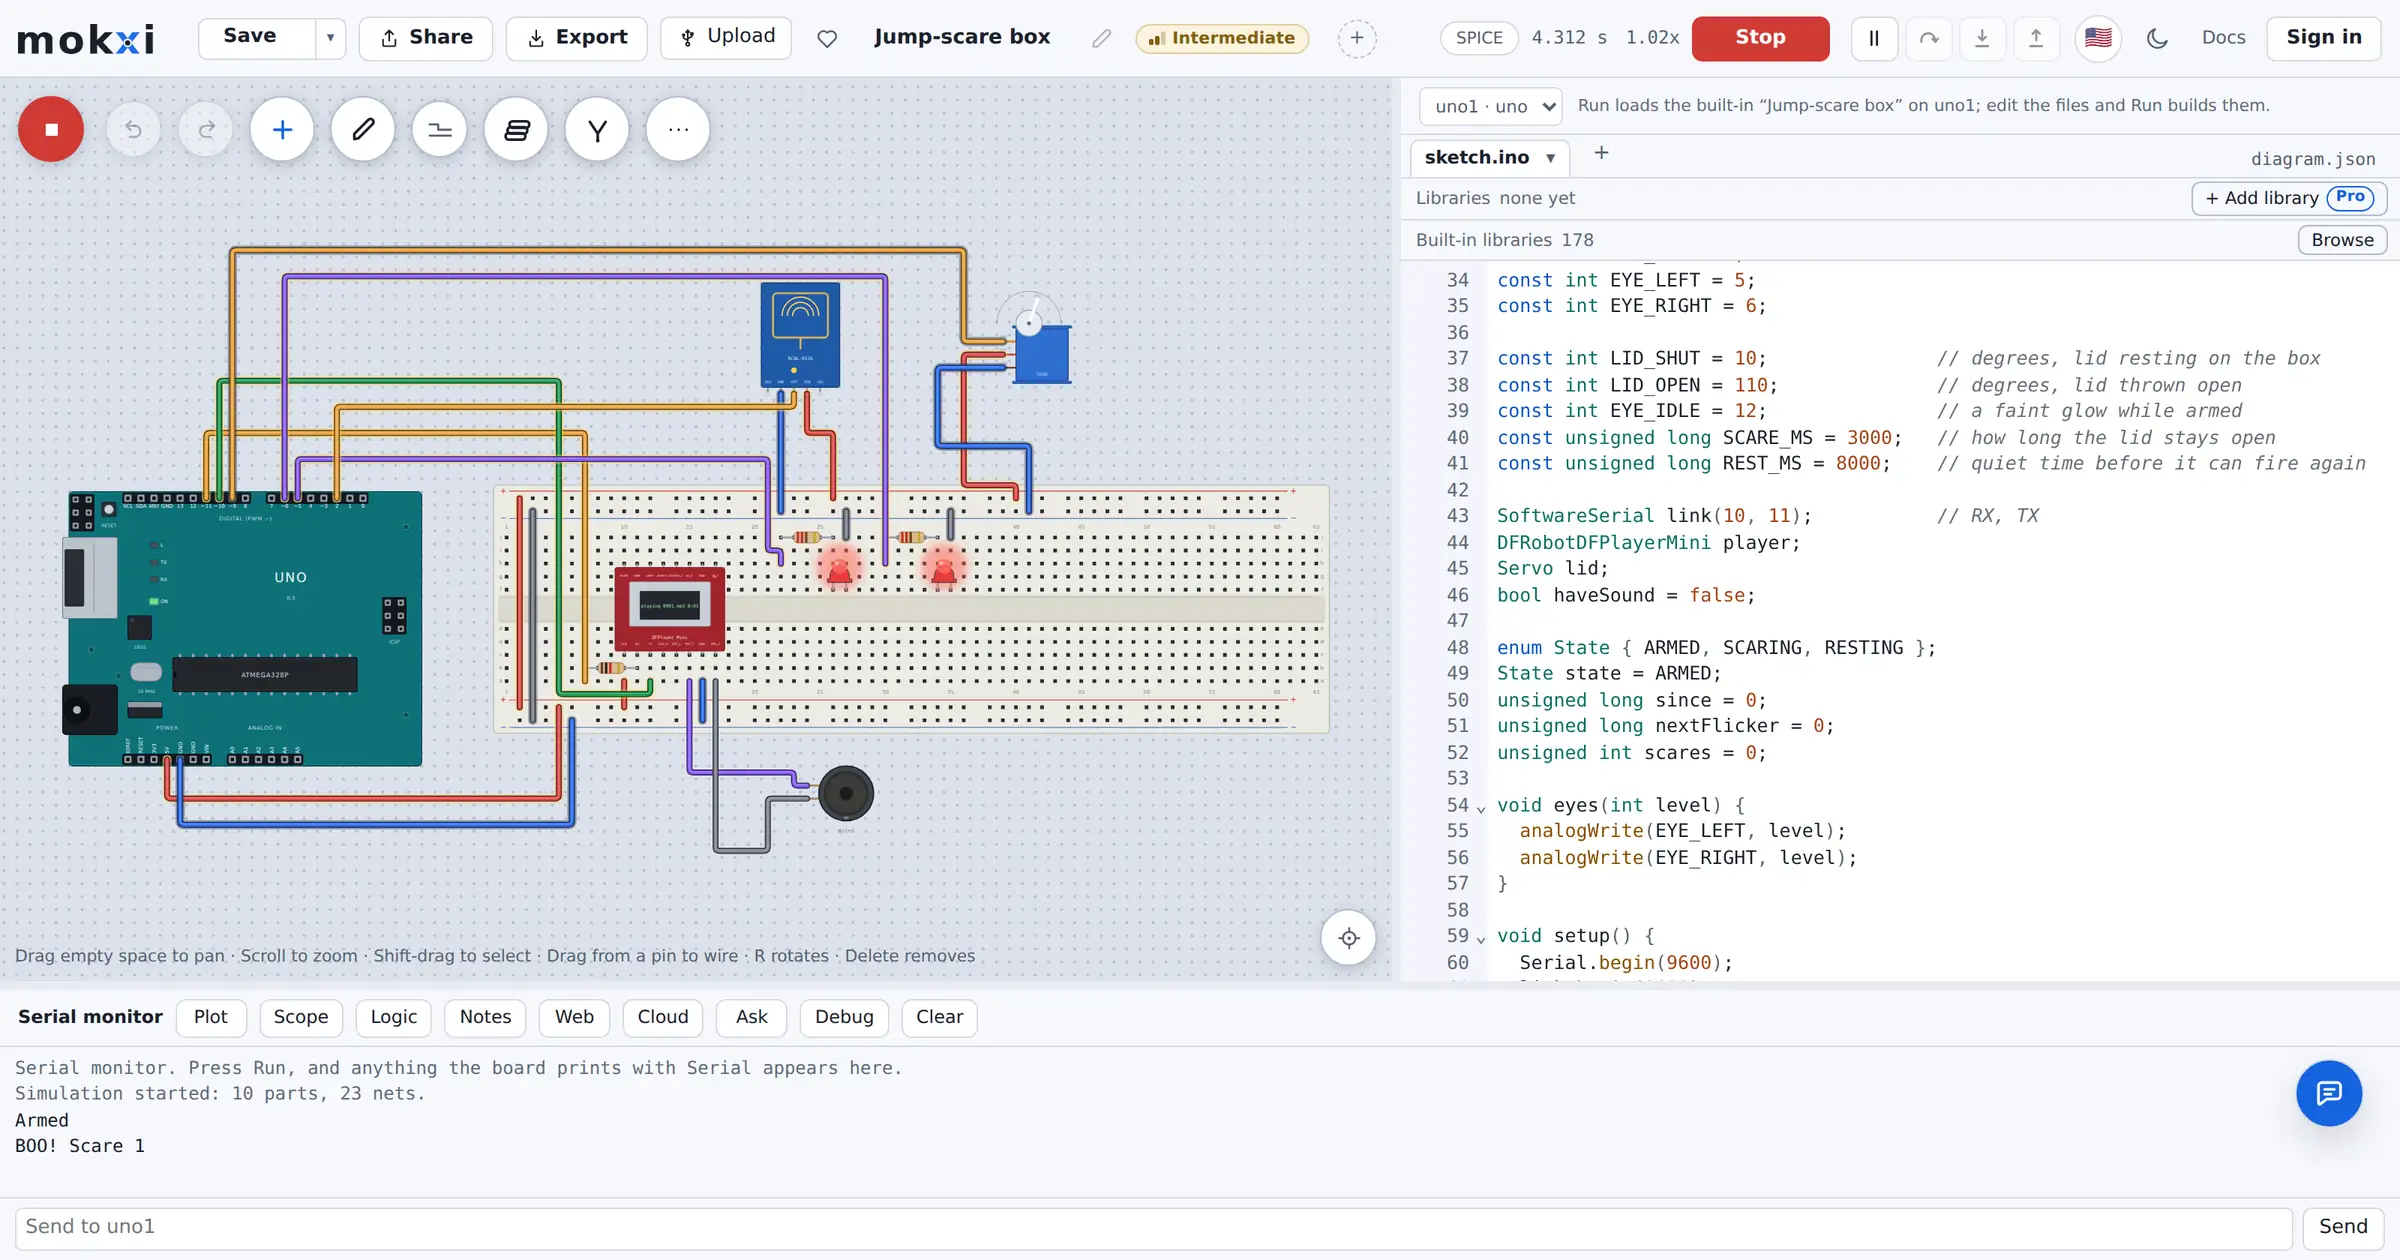
Arduino Halloween props have one night to work. A box that throws its lid open when someone walks up is a great porch prop, and a frustrating one if the servo resets the board on Halloween night. This post walks you through the jump-scare box from the Mokxi Halloween builds: how it is wired, how the sketch works, and how to test and tune the whole show in your browser before you buy a single part.
The box is simple to describe. A radar sensor hidden inside sees someone walk up. A servo throws the lid open, a DFPlayer Mini plays a scream, and two red LED eyes flicker. Then the lid shuts, the box rests, and it only arms again once the porch is clear.
Why test a Halloween prop in the browser first
Most prop problems are not about the idea. They are about timing and wiring: the lid stays open too long, the sensor fires at nothing, or the scream starts a beat late. You can find all of those on a simulated board.
Open the jump-scare box project and you get the full circuit on a breadboard next to an Arduino Uno, with the real sketch in the code pane. Press Run and the sketch runs on a model of the Uno's chip. Click the radar to walk up to the box. You will see the servo swing, the eyes flicker and the Serial Monitor print what the sketch is doing.
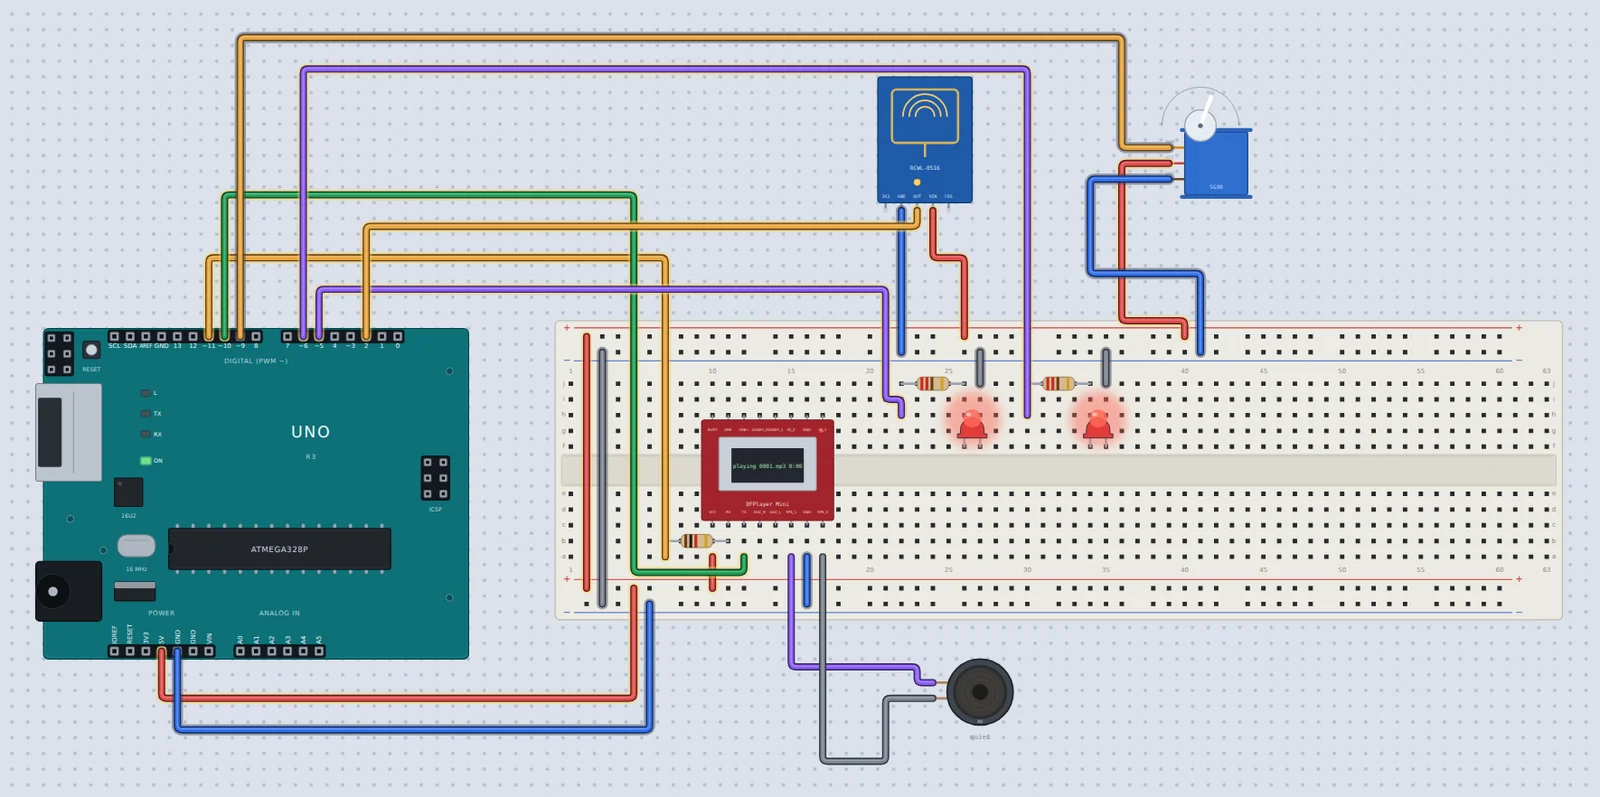
One thing to know up front: the simulated DFPlayer makes no sound. It shows which file it is playing and how far into it, so you can check that the scream starts on time. The audio itself is for the real speaker on the porch.
The jump-scare box is one of five ready-to-run builds on the Halloween projects page. The others are a fog machine trigger, a candy bowl that grabs back, a talking skull and a haunted window with lightning. If you want the overview of all five, with safety notes and a parts list, read the Arduino Halloween props guide. This post goes deep on one of them.
The parts and the wiring
Here is everything the box uses. Each line comes straight from the comment block at the top of the sketch.
- RCWL-0516 radar sensor: VIN to 5 V, GND to GND, OUT to pin 2. Its output is high while it sees movement.
- Hobby servo: the signal wire (PWM) to pin 9, VCC to 5 V, GND to GND. This is the arm that lifts the lid.
- DFPlayer Mini: VCC to 5 V, GND to GND, its TX to pin 10, and its RX fed from pin 11 through a 1 k resistor. A small speaker goes on SPK_1 and SPK_2, and track 001.mp3 on the microSD card is the scream.
- Two red LEDs for the eyes: on pins 5 and 6, each through a 220 ohm resistor to GND.
Why a radar and not a PIR motion sensor? The sketch explains it: the RCWL-0516 sees movement through a thin plastic or cardboard wall, so it can hide inside the box. The same comment warns that it also sees through doors and thin walls, so aim it away from the house. A PIR works on the same pin, but it needs a hole to look out of.
The eyes are on pins 5 and 6 for a reason. Those are PWM pins on the Uno, so analogWrite() can set their brightness instead of just turning them on and off. That is what makes the flicker look like a candle.
The sketch, step by step
The full sketch is on the project page. Here are the parts that matter, taken from it as written.
The settings you will tune
const int LID_SHUT = 10;               // degrees, lid resting on the box
const int LID_OPEN = 110;              // degrees, lid thrown open
const int EYE_IDLE = 12;               // a faint glow while armed
const unsigned long SCARE_MS = 3000;   // how long the lid stays open
const unsigned long REST_MS = 8000;    // quiet time before it can fire again
These five numbers are the personality of the prop. LID_OPEN and LID_SHUT are servo angles in degrees. SCARE_MS is how long the scare lasts, in milliseconds, so 3000 is three seconds. REST_MS is the quiet time afterward. EYE_IDLE is a dim glow (out of 255) so the eyes are just visible while the box waits.
Three states, no delay()
The sketch never waits in delay(). Instead it keeps one state and the time it entered that state:
enum State { ARMED, SCARING, RESTING };
State state = ARMED;
unsigned long since = 0;
A state machine is a program that is always in exactly one mode and moves between modes when something happens. Here the modes are ARMED (waiting), SCARING (lid open) and RESTING (lid shut, cooling off). Because nothing blocks, the sketch reads the sensor every time through loop(), and the eyes can flicker while the lid is open.
Armed: wait for a visitor
case ARMED:
  if (someone) {
    state = SCARING;
    since = now;
    scares++;
    lid.write(LID_OPEN);
    if (haveSound) player.play(1);
    Serial.print("BOO! Scare ");
    Serial.println(scares);
  }
  break;
When the radar pin reads HIGH, the sketch notes the time, opens the lid, plays track 1 and prints a count. The haveSound check matters. In setup(), the sketch asks the DFPlayer to answer. If it does not, the Serial Monitor prints "No DFPlayer answered: the box will scare in silence" and the lid and eyes still work. A prop that fails gracefully is a prop that still scares someone.
Scaring: flicker until time is up
case SCARING:
  if (now - since >= SCARE_MS) {
    lid.write(LID_SHUT);
    eyes(0);
    state = RESTING;
    since = now;
    Serial.println("Lid shut, resting");
  } else if (now >= nextFlicker) {
    // A candle-like flicker: a random level, held for a random moment.
    eyes(random(40, 256));
    nextFlicker = now + random(30, 90);
  }
  break;
Each pass checks how long the lid has been open with now - since. Until SCARE_MS has gone by, the eyes jump to a random brightness between 40 and 255 and hold it for a random 30 to 90 milliseconds. That uneven timing is what reads as a flicker rather than a blink.
Resting: one visitor, one scare
case RESTING:
  // Rearm only once the rest is over and nobody is standing there, so
  // one visitor gets one scare.
  if (now - since >= REST_MS && !someone) {
    state = ARMED;
    eyes(EYE_IDLE);
    Serial.println("Armed");
  }
  break;
This is the detail that makes the prop feel polished. The box will not rearm while someone is still standing in front of it, so a visitor who lingers does not get the lid slammed at them over and over.
Tune it before you build it
This is where the browser pays off. Try these in the editor, pressing Run after each change:
- Bigger throw. Raise
LID_OPENand watch how far the servo swings. Pick the angle that suits your lid hinge. - Longer scare. Change
SCARE_MSfrom 3000 to 5000 and check that the flicker and the DFPlayer still line up with the open lid. - Faster rearm. Shorten
REST_MSif you expect a steady stream of trick-or-treaters, or lengthen it for a quiet street. - A surprise for repeat visitors. The sketch suggests putting a second track on the card and picking one with
random(1, 3)so the same scream does not play every time.
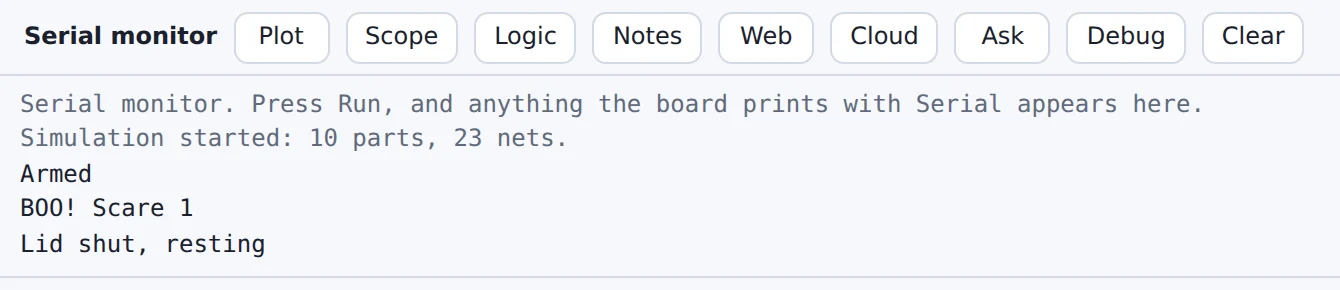
Keep an eye on the Serial Monitor while you test. "Armed", "BOO! Scare 1" and "Lid shut, resting" tell you exactly which state the box is in.
Moving to real parts
When the timing feels right, the same sketch goes onto a real Uno. Two notes from the sketch itself are worth repeating:
- Give the servo its own 5 V supply, such as a USB power bank, with its ground joined to the Uno's ground. A servo that jumps hard can pull the Uno's 5 V down far enough to reset it, right at the scary moment. The servo part page covers its wiring in more detail.
- Aim the radar away from the house, since it sees through doors and thin walls.
Put the scream on the microSD card as 001.mp3, check the DFPlayer's RX line goes through the 1 k resistor, and you are ready for the porch.
Ready to build it yourself? Create your free Mokxi account and open the editor in your browser. No installs, no parts to buy.